Reaper Complete Guide Ver.2 - Various useful settings to know -
- AZ Sarina Takeda
- Aug 26, 2024
- 8 min read
This is the second part of the information we have released for those who are considering installing Reaper.
Introducing recommended features that you can use immediately after downloading
★Table of Contents★
Setting up Reaper
2. First things to set
Reaper Recommended Features
1. Track
2: Routing
3: Envelope
2. Video
1-1: Make mp4 available
1-2: Import
3. Shortcuts
5. Export
Setting up Reaper
Install Reaper and change it to Japanese
Please check this blog for installation and Japanese localization.
You're all set!

First thing to set up: [Preferences]
The first thing you do when you launch Reaper is to set it up .
By setting these three points, you can share projects within your team with peace of mind.
Reaper Preferences
Project Settings
Create a project template
1. Reaper Preferences
Select the Options tab (Ctrl+P) → “Preferences”.


This time, we will only focus on the points that you need to set.
Recommended environment settings
Startup project settings
project
Timed project backup
audio
device
display
media
Plugins
VST
1. General

① Check your language settings
If you have downloaded the "Japanese Pack", it will be set to Japanese.
②Startup project settings
You can choose the first session that appears when you start REAPER.
Recommended for: New projects
If you set the previously opened session as the startup session, when you start working and want to open and create a small project, if the previous session is a large session with over 100 tracks, you will first have to wait for it to open.
To avoid this, you can set it to a new project here.
1-a. General [pass]

① Consolidate all peak caches (reapeaks) into an alternative path
A reapeaks file is the waveform information of a media item that has been imported into Reaper.
Collect them in the specified folder.
If you write [peaks], you can put them all together in the source folder in the session folder.

2. Project [Backups]

[Backup when saving a project]
① Save the previously saved project version as [○○]
You can specify the backup file name.
Recommended: [project name_timestamp.rpp-bak]
② Save the time-stamped backup to the project subfolder [Backups]
It automatically creates subfolders and stores the data in them.
③Create a specified number of backups starting from the most recent
Recommended: 20 pieces
3. Audio [Device]

1. Audio system/ASIO device
Set the audio input and output.
Since I am using an audio interface, I selected ASIO and the name of the interface.
②Select the input channel
Set this when using a microphone for Foley recording, etc.
③Output Channel
Select your speaker.
④Specify the sampling rate
If there is a team/title designation, please follow that.
Also, please match the settings to your audio interface.
Recommended: 48000Hz
4. Display [Media]
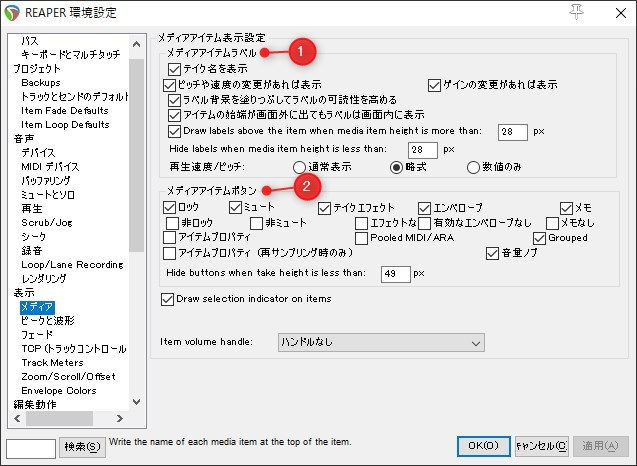
①Media item label
☑ Show take name
Show/hide waveform name
☑ Show any changes in pitch or speed
The pitch/speed change value is displayed.
I recommend ☑ as it is often used in scripts.
☑ Display any gain changes
The volume increase/decrease is displayed.
I recommend ☑ as it is often used in scripts.
②Media item button
We recommend checking the following three points.
mute
Note
Volume knob
5. Plugins [VST]

①VST plug-in path
The folder containing VST plug-in data (.dll) will be listed.
If you have newly purchased plugins and they are not showing up in Reaper, please check that you have included the folder in this path.
②Rescan
If you add or remove a new path, please click rescan here.
③ Edit the path list
Any previously added paths will be displayed.
If you want to add or delete a new pass, you can do so here.
First thing to set up: [Project Settings]
Select the File tab (Alt+Enter) → “Project Settings”.
Project Settings

Sampling projects
The setting you made during configuration
Recommended: 48000Hz
[media]

① Destination for media files
Create a folder to store the waveforms and videos used in the project.
This will make it easier to share your projects.
Recommended folder name: source
②WAV bit depth
Sets the bit depth of the project.
If there is a team/title designation, please follow that.
Recommended: 24bit
[movie]

Frame rate
You can set the number of frames for imported videos in your project.
Please set it according to the video you are importing.
Recommended: 60
Click [Save as default project] and the settings are complete.
First thing to set up: [Create a new project]
The configuration is complete.
Let's create a new project.
1. Select the File tab ⇒ New Project (Ctrl+N)

2. Save your project
①File name: Session name
②File type: REAPER Project files (*.RPP)
③Create a project folder inside ☑
- A parent folder will be created and the folder created during creation will be included in it.
④☑ Copy all media you are using
-Waveforms, videos, etc. will be copied and saved to the "Media file save destination "

3. Finished!
Your session has been created!

First thing to set up: [Project template]
Finally, save it as a project template.
This will help to minimise discrepancies within the team.
1. Project Preparation
Create a template project

You can save not only tracks but also plugin settings.
Reverb and envelopes are also saved.
2. Save your project
Create a project for the template.

Select the File tab
⇒Project template
⇒Save the project as a template

File name: Project name
File type: REAPER Project files (*.RPP)
Your saved templates will be stored here.
C:\Users\ユーザー名\AppData\Roaming\REAPER\ProjectTemplatesHere is the completed template!
Now let's load the completed template.
3. Launch a template session
Insert the template session into the link above.

Select the File tab
⇒Project template
I put it in the ProjectTemplates folder earlier.
The project is displayed.
Save your project and you're done!
Reaper Recommended Features
We will introduce the functions that we actually use in our work.
There are many DAWs out there, but Reaper is one that is very intuitive to use.
If you use this "recommended feature", you can create stress-free!
1. Truck
1: Organizing tracks into folders
First, create a track.
Double-click an empty Track Control panel
A new track will be generated.


Once you have created a few tracks, group them together in a folder.
Select the parent track and click the folder icon in the bottom left.
This will include all folders below it.

2: Routing
Routing is essential when setting up reverb or multi-channel.
REAPER makes connecting intuitive.
Just drag and drop the [ROUTE] on the track to which you want to connect!


3: Envelope
You can display the envelopes on the track.
Volume [shortcut: v]
Pan [shortcut: p]

This envelope can be shown/hidden, but you often find yourself wondering, "Which track did I put it on?"
In that case, select "Show in Media Lane" from the envelope settings button.

4. Item approach
Various settings can be made for items.
Multichannel to Mono
Right-click → "Item Settings" and use "Take Channel Mode"
Can be used only on the channels you want to use

Various adjustments with the alt key
- Hold down the alt key and move the mouse left or right: Change the playback position within the item
-Hold down the alt key and move the edge of the item left or right: The playback speed of the item will change.

2. Video
Next, we will introduce some recommended features when importing videos.
REAPER has no import limit, you can have as many in your project as you want.
1-1: Make mp4 available
Reaper cannot play mp4 files with the default settings.
So download VLC Media player .
Open Reaper and if you see the letters VLC in the video decoder then you've succeeded.
-Options > Preferences > Media > Video > Output: Show available decoders

1-2: Import
Importing is completed by dragging and dropping from the folder.
*Please set the project settings first.
The video window will be displayed by selecting the View tab ⇒ Video.

2: Add subtitles to your videos
Amazingly, you can edit videos and add subtitles using just REAPER.
Create a new MIDI item at the position in the video where you want to add the subtitles
Please place it above the track containing the video.
Add the effect [Video Processor] to the MIDI item.
Select [Overlay:Text/Timecode] from Customized Processor
Open the MIDI item properties and change the [Take name] to the text you want to display.
Subtitles will appear above the video!
You can also set the font size and position.
3. Shortcuts
From common shortcuts to Scripts, which are one of the great features of REAPER!
Once you register, you can do anything in an instant.
1. Register recommended actions as shortcuts
You can register shortcuts for actions that exist in the "Action List".
Actions tab → Action list
→ With an action selected, click "Add" under "Shortcuts for selected action"
→You can freely register shortcuts

Recommended Actions
1. Playback controller: Play/Stop
-Returns to start position when stopped
2. Playback controller: Play/Pause
-When you stop, the seek bar stops at the position where you stopped.
3. Marker: Insert a marker at the playback position
4. Marker: Insert region to match selected time
5. Marker: Jump to previous marker or end of project
6. Marker: Jump to the next marker or the beginning of the project
2. Register the Script
You can register the script you created as a shortcut!
1. Add a script to the action
This time I will use a script that I actually use in my work.
AZ_SetSelectedMediaFade : [Sets the start/end fade type and length of the selected item]
*Please purchase BRONZE to use this product.
*See here for how to create a Script.
2. Specify a shortcut for the added Script (action)
3. Finished!
Start creating scripts with REAPDOCK/APIDOCK
If you want to register other Scripts as shortcuts,
Check out the Script documentation, which is updated weekly.
□LUA
Python
3. Add to Toolbar
I register too many things and sometimes I forget what actions to use...
If you are one of those people, add it to your toolbar!
1. Right-click on the toolbar and select Customize toolbar.
2. Select Add at the bottom left → The action list will appear, so select Script this time
You can select anything in the action list.
3. Select an icon for the added action
4. Registration complete!

4. Display Window
There are a wide variety of windows that can be displayed.
You can also display it on the project window using a feature called "dock."
Select the View tab →
1. Video
-Multiple imports possible
-However, there is a priority order from top to bottom.
2. Time display
- Display the time of the playback position
-You can freely choose the display time, such as seconds or frames.
3.Peak display settings
-Item (waveform) display can be changed to spectrum, etc.
4. Navigator
- Shows where items are
-Great for projects with multiple vertical rows of trucks
5. Export
Work is done in the session! Now it's time to export!
Reaper can export both video and audio at the same time.
Select the File tab → "Render to audio file"
1. Output
-Directory: Select the destination folder
- File name: Select "Wildcard" to automatically change the name
2. Main output format/Simultaneous output format
- Two types can be written at the same time

lastly
This is the complete guide to Reaper, version 2, and it introduced a variety of settings!
The first installment will be introduced in blogs and videos.
We hope that taking a look at this will give you a foothold in introducing Reaper.
-Youtube

Comments